| Department of Computing | Imperial College London |
| Introduction to Linux | |
Linux is an open-source implementation of the long-lived UNIX operating system and the Ubuntu Hardy (8.04) version is the particular distribution of Linux installed on most of the workstations in the Department of Computing from summer 2008. Many of the workstations also run Microsoft's Windows Vista operating system and you can select either of these when starting up the machine; systems which run both will start up in Linux unless you specifically select Windows Vista.
Type in your login name, which you will have received in your starter pack, then press the enter/return key. Now type in your password and press the return key again. For security reasons, the password isn't displayed on the screen as you type it.
When you have given the banner program your login name and password, the screen will clear and after a few seconds your desktop will appear.
A program called the window manager controls what you see on the screen; there are a number of different ones you can select from - this guide uses one called KDE as an example.
You will notice that moving the mouse affects the position of a cursor in the window. The mouse provides your primary interaction with the graphics user interface. It controls most of the functions of the window system and you will use the mouse to point to and select desired options. When you slide the mouse on its mat, the mouse cursor on the display tracks the movement. When you press or hold the mouse buttons, the system responds with appropriate actions. The mouse has three buttons, known as left, middle and right (with the cable pointing away from your wrist).
Sooner or later you will have many overlapping windows on your screen. You can raise an obscured window to the front of the display to see its contents by clicking the left mouse button when the cursor is over the window.
After some time, your screen will normally contain several windows, and you may find it convenient to temporarily move some windows out of the way. You can do this by changing the window into an icon, which is a small symbol that represents a window but takes little space. You can iconify the window by clicking in the leftmost of the three small boxes at the left hand corner of the title bar. It is known as the minimise button. The contents of the window aren't visible when it is shown as an icon. The icon appears in the bar along the top of the screen and you can change the icon back into its full window representation by clicking on this. You can also use the pager (the squares numbered "One" to "Four" on the task bar) to view different areas of the desktop.
Position the mouse cursor in the bar at the top of the window, called the title bar, then press and hold the left mouse button. Drag the window to the new location. Release the mouse button when you are satisfied with the position of the window.
To enlarge or shrink a window, place the mouse cursor over the small box at the extreme left hand side of the title bar of your window and click the left mouse button. A menu will appear which offers various window operations including resizing. Move the mouse until the cursor is over resize, click the left button and move the mouse to stretch or shrink the window. Click the left button again when the window is the size you want.
When you are ready to finish your session, click the K button on the taskbar and choose the Logoutoption. After you have confirmed your decision to logout all windows will close, the screen will clear, and a few seconds later the login banner will re-appear, ready for the next user.
Instructions which you give to the Linux operating system are known as commands. In this guide, all examples of command usage are indented; command names and other words which form part of the command appear exactly as they are to be typed. For example, describing how the xemacs editor can be invoked, the example will appear as either:
xemacs File1or
xemacs filename
Note that words representing generalised arguments to commands (eg. filename) appear in italics. Sometimes examples are given which show the screen output of a command -- in other words, what you might expect to see if you were to type a certain command at a terminal. These examples are represented thus:
vector17% ls -a
.cshrc File1
.login File2
vector17%
The command to be typed literally appears in bold-face (ls -a); while the rest is the result you might expect on the screen if such a command was issued to a computer. The word
vector17%
is the default system prompt on the computer called vector17.
The prompt tells the user that Linux is ready to receive another command.
Literal keys on the keyboard are enclosed within angled brackets as, for example:
<RETURN>
meaning press the key marked RETURN (note that on some keyboards this key is simply marked ¿).
Similarly, sequences such as:
Ctrl-c
mean you should press the key marked Ctrl and the key c at the same time.
The examples we give usually refer to computers supported by the Computing Support Group (CSG) and may therefore not be available on laptops or home machines or non-maintained desktops.
man lpr
will give you information on the standard printing command.
If you are not sure of the exact name of the command that you want information on, you can try a keyword search by giving the k flag to man. Eg:
man -k editor
A print job can be sent to a printer by using this command:
lpr printername filename
Each printer in the department has a blue label on it indicating its name.
See also: manual page on lpr.
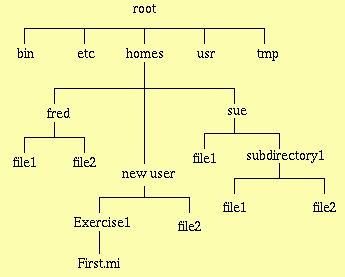
The diagram shows the classic Linux directory structure:
Root is always addressed as "/" and the division between each directory is also a "/". So the pathname to reach File1 in the directory fred is:
/homes/fred/File1When you login to a computer running Linux and on which you are a registered user, you will always be placed in the directory where your files are located. This is your home directory. It is an area where you are able to create new files and subdirectories, move and remove old files, edit files, etc. Home directories are logically located under the subdirectory homes.
In most cases, your home directory will not be physically stored on a file system attached to the computer you are connecting to. In other words, the file system is being mounted across the network onto the computer to which you are connected. NFS (Network File System) makes sure that the filesystem containing your home directory is mounted and accessible by you at all times during your session. Similarly, other file systems are mounted across the network so that compilers, applications and data can be shared among all the users of the network.
To list the contents of the current directory (the directory you are currently "in"), simply type:
lsAll the files in your current directory will be listed in alphabetical order. There are a number of options (flags) that can be used with the ls command:
ls -a
ls -l
ls -d
Various commands are available for reading the contents of a file.
The cat command is used to look at the contents of a file. You can see the contents of any file by typing:
cat filenameIt's called cat because if more than one filename is specified, all files are concatenated and displayed on your terminal screen. The command can only be used meaningfully with text files. With non-text files, the results obtained from cat are usually unreadable.
The more command can be used to display a file, one screenful at a time. It is similar to cat, but pauses each time it fills the screen. You can invoke more by typing:
more filenamePress <SPACE> bar to view another screenful, <RETURN> to view another line and <q> to quit from more.
Here is a list of some of the most useful commands:
b to scroll backward
q to quit
h to get a summary of all the available commands under
more
The command less is more than more.
It is similar to more except that it offers the commands
listed above, plus extra options including:
g to go to line N
The cp command is used to copy files. It copies one or more
files, including text and executable program files. For example, to make a
backup of File1, type:
cp File1 File1.bak
where File1.bak is the name of the backup copy of the file.
cp can be used to copy files between directories as well.
The mv command moves files and directories around within the
filesystem. A move differs from a copy operation in that the original name
of the file disappears -- the file is effectively renamed. So mv can also
then be used for renaming a file or a directory.
To delete a file you use the rm command. This command deletes
Files from a directory. For example, if you wanted to delete a file called
File1 then you can do so by typing:
rm File1
To delete a file, you must have execute and write access permission
to the parent directory of the file, but you do not need read or write access
permission to the file itself.
NB: unlike some other operating systems, once you remove a file in Linux you
cannot recover it so be very careful with the rm
command.
There are a number of options available which you can look up in the manual pages.
Every file or directory that is created on the system has an owner, who is usually the person who created that file or directory in the first place. The owner of a file or directory can then assign various protections, allowing or prohibiting access to that directory or file. There are three classes of users for every file and directory:
The mode of a file or directory can be changed with the
chmod
command.
For example, if you wanted to set the write permission to a file, you need to type:
chmod +w filename
Similarly, to set the group execute permission on a file:
chmod g+x filename
You can remove permissions from a file's mode by using - instead of +.
Most users will have in their home directory files called .cshrc and .login (by convention, filenames starting with a dot are either administrative or startup files for shells, applications and compilers). The .login file will, among other things, assign appropriate values to important variables such as PATH (which directories to search for commands) and TERM (what kind of terminal you are using).
CHANGING THE DEFAULT SETUP IS NOT RECOMMENDED. For an easy life, leave these startup files alone. They have been carefully constructed to provide a standard environment which works. If you make changes, things may work for a while until something on the system is upgraded or moved. On CSG maintained systems you will in any case not be able to edit most startup files directly since they are simply links (symbolic links) to standard system files. The exception to this is the .cshrc file.
The .cshrc initialises the environment for the shell you run (the C-Shell) and is an exception because it is useful, for example, for users to be able to set their own aliases. For new users the .cshrc file contains only one command:
source /usr/local/etc/default.cshrc
This instructs Linux to execute the standard system-wide cshrc file
located in the directory /usr/local/etc (you may wish to look at the
comments at the beginning of this default file - just type:
more /usr/local/etc/default.cshrc).
Don't alter this line; you can however add instructions after it.
Examples of the kind of additions you might wish to make to your .cshrc
file can be found in the section The Shell in the "More
information on Linux" part of this guide.
Disk space for file storage is not infinite and as a result disk quotas and limits are set for each group of users on the system.
quota -v
will check your quota and current disk usage. If you have exceeded the quota, you will have seven days to remove sufficient files to reduce your usage below the quota. If you exceed the limit, you will be unable to create more files and could lose e-mail. You may also have difficulty logging in - particularly under X-Windows since X creates a number of temporary files.
The gzip command will compress data. It reduces the size of the
named file using adaptive Lempel-Ziv coding. Compressed files can be restored
to their original form using the gunzip command. To compress a
file, simply type:
gzip filename
The compressed file will automatically be saved under the same filename with a suffix .gz attached to it. A compressed file can be viewed (without the need to uncompress) with:
zcat File1.gz
It is considered good practice to compress files which you do not regularly access.
/vol/bitbucket is an area of disk where you can create extra workspace for your files without affecting your disk quota. It is therefore an ideal place to store your temporary files. However, a word of caution the files stored under /vol/bitbucket are erased regularly so it is advisable not to store important files in this area. Also note that any files kept here are not confidential - they can be read by anyone.
From time to time you might find a file called core in your filespace. This is a memory dump and they can be quite big. There are a number of reasons why they arise from simply killing a process to hitting an illegal instruction. Unless you are using them to debug programs, you should delete them and free up some of your disk quota.
Kerberos is a security system implemented on all CSG supported Linux computer systems. It provides a high level of security since passwords are not stored in any place or in any form that is accessible by persons who may wish to crack them.
ls |
List the files and directories in the working (current) directory |
cat File1 File2 |
Display the contents of the file File1 concatenated with the contents of the file File2 |
mv File1 File3 |
Change the name of (move) file File1 to File3 |
cp File1 File3 |
Make a copy of File1 and call it File3 |
rm File4 |
Erase (remove) the file File4 |
less File1 |
Display the contents of File1 a page at a time, q to stop displaying |
lpr File1 |
Print the contents of File1 on the default printer |
pwd |
Print the name of the working directory |
cd Exercise1 |
Change the working directory to Exercise1 |
mkdir Exercise2 |
Make a new directory and call it Exercise2 |
rmdir temp |
Delete the (empty) directory temp |
finger |
Say who is logged in |
finger -l tom@doc |
Get full details on all DoC users with string "tom" in their name or login |
who |
Say (briefly) who is logged in |
man finger |
gives you a detailed description of the command finger |
man -k library |
tries to find any reference to library in the manual |
passwd |
Change your password |
ssh sync10 |
Login to remote host sync10 |
logout |
Disconnect from the computer |
| © CSG / Oct 2008 |