| Department of Computing | Imperial College |
| Howto Guide for Lecture Room 311 | |
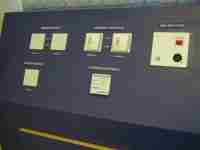
How To Set the environment Controls
How to use the Crestron Control Touchscreen
How To Set the environment Controls
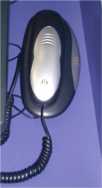
The microphone is located in the AV cabinet on the right hand side of the console, shown below.

Clip on the receiver and microphone and switch the transmitter on. It may be that you are unable to hear your own voice from the speakers in the lecture theatre, this is normal as the system has been set up to distribute your voice naturally throughout the lecture theatre. Please remember to switch off after use.
It is very important to remember that there is a switch, labelled AV Power on the top of the console at the back left shown below, which isolates the PA Amplifier, DVD Player, Subwoofer and Microphone receiver. Therefore, if you intend to use any of these items, you MUST ensure that the switch is ON.

How to use the Crestron Control Touchscreen
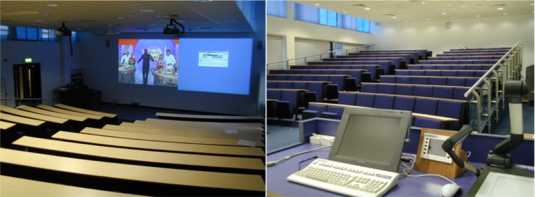
In order to control the two high spec projectors in this lecture room, it is necessary to use the Crestron Control System. The control panel for this is a small colour Touchscreen labelled "AV Control" which sits between the workstation Flatscreen and the Visualiser.
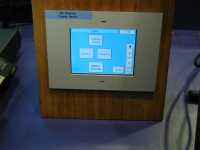
The Touchscreen is brought to life by touching the screen, and will beep when you press a button.In the Home Page, Screen 1 refers to the projector closest to the Console. When you press either of the Screen buttons, the relevant projector will start to warm up.Once the projector has warmed up, it is the possible to select the input you require.
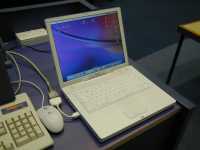
To use the Laptop input, plug the Video cable, Network cable and Audio cable, all found on the top left of the console, into your laptop and select Screen2 from the Home Page followed by Laptop. The resolution should be no higher than 1024 X 768, and it should be noted that some laptops, including the Sony Vaio, allow a different resolution for the screen and the Video output.
The workstation can be used without having to project onto either screen. If you wish to project, select either Screen from the Home Page of the Touchscreen followed by the PC button. Inside the AV cabinet there is a wireless (Bluetooth) Presenter which can be used to navigate forwards and backwards through a PowerPoint presentation, and also as a laser pointer.
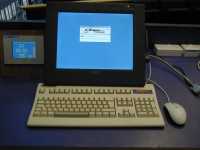
The flatscreen monitor has a special pen, which sits in a holder on the right side. This pen can act as a mouse, or to annotate PowerPoint slides as you lecture.NB. Please don't use a normal pen, as 1. it won't work and 2. it will damage the screen.
To raise the camera arm, press the sliding switch at the base of the arm.
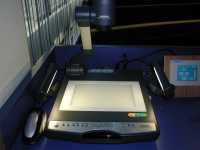
To use the Visualiser, select Screen1 from the Home Page and press the Visualiser button. This will turn on the Visualiser so that it is ready to use. The Touchscreen will display a small image from the Visualiser in order that you may align the object to be projected. Also on the Touchscreen there are three buttons to control the light source on the Visualiser.
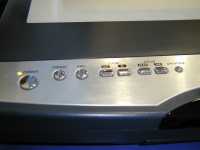
On the Visualiser itself are the Zoom controls, Focus and Mode control. Mode should always be set to XGA for maximum resolution. Should your image (particularly the whites) look slightly off-colour, press the AWC button to automatically adjust the colour balance.
There is a Freeze button on the Visualiser which can be used to freeze the current image while, for example the page is changed, and then pressed again to un-freeze, creating a seamless transition.The audio source will be set automatically from the last input selected for a projector. To select a different Audio input, press the Audio button and then the corresponding button for the input of your choice.
When you have finished your session, select the Home Page and press System Standby to ensure that the system is ready to be used by the next Lecturer, and switch off the Microphone.
If you require further assistance, please telephone the CSG Helpdesk on 46664 or send a student (to room 220) during the hours 9am to 1pm and 2pm to 6pm Monday to Friday.
© CSG / 2002 /
help@doc.ic.ac.uk
/ 
|