In this section you will modify the Sample New Editor plug-in so you can test it.
Note: This assumes you have already created a New Editor plug-in project using the instructions here.
| 1. | In the Project Explorer View, locate the new project plugin.xml file. |
| 2. | Right click the file and select Open with àText Editor |
| 3. | Remove the comments around the <editor> extension entry as show below by removing the lines indicated. |
<extension
point="org.eclipse.ui.editors">
<!-- ** REMOVE THIS LINE **
<editor
name="New LTSA Eclipse Editor"
extensions="new"
icon="icons/ltsa.gif"
contributorClass="uk.ic.doc.ltsa.eclipse.neweditor...."
class="uk.ic.doc.ltsa.eclipse.neweditor.editors.myEditor"
id="uk.ic.doc.ltsa.eclipse.neweditor.editors.myEditor">
</editor>
--> ** REMOVE THIS LINE **
</extension>
| 4. | Save the file |
| 5. | From the Eclipse menu options select Run àRun as àEclipse Application. This opens up a new instance of the Eclipse SDK with the Sample New Editor loaded as a plug-in. |
| 6. | In the new opened Eclipse SDK window, create a new General Project. |
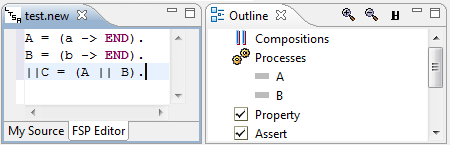
| 7. | In the new General Project, create a new text file.and name it test.new. |
| 8. | The new Sample New Editor should be opened with the new text file. |
| 9. | You can test the new editor by selecting the FSP Editor tab on the bottom of the new editor window. This should now show some processes in the Outline view. |